

A very important part of my job as a K-12 computer science teacher is to take concepts that may seem impossibly complex to some and come up with ways to make them more accessible to all of my students. In this post, I’d like to share an activity I did with my students grades 7-10 to engage them in machine learning.
There are many aspects to machine learning and the process I guided my students through is predictive modelling which consists of 5 steps:
- Obtaining data
- Correctly formatting the data
- Training a model with the data
- Testing your model
- Improving your model
Like many processes in engineering/design, this is not a process you step through once. It is a cycle you perform multiple iterations of and there is no set number of times you should go through the cycle.
I was inspired to tackle this subject with my students after watching a video on youtube by LearningCode.academy: “Machine Learning Tutorial for Beginners – USING JAVASCRIPT!”
There were several things I liked about this video:
- It was short (less than 12 minutes)
- I could jump right into the provided example code and start playing around with it with no setup required
- The problem presented was easy to understand
All these things told me I could make a lesson plan out of it. If I stand in front of my students and lecture for more than 10-15 minutes I will lose most of their attention. I need to be able to get them engaged in a meaningful task for the most learning to occur. So, having tedious setup to go through on their computers would also be detrimental which is why I like online tools like codepen for in-class activities.
I did feel like I needed a different problem from the one in the video, one that could encourage both collaboration and individual effort. I thought of a well-known beginner project in machine learning, Building a model to recognize handwritten digits in Tensorflow. That project, as it is, is a bit out of scope for a 1-hour class with middle school students so I created my own version. I like the notion of recognizing digits, there are 10 distinct items we want to train our model to recognize and there are many ways to collaborate here. Even if students are tempted to split up the individual digits and have specific people get the model working for specific digits, they’ll still have to put their data together and test it out and find test cases that fail and work together to improve the model.
Here’s the program I made. I used two libraries. First, brain.js (Neural Networks implemented in JavaScript) and second, p5.js (a JavaScript library similar to Processing, made to make programming more accessible).
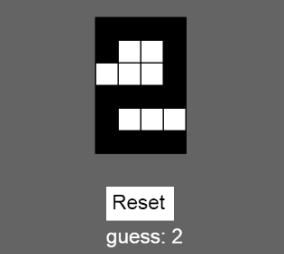
I used p5.js since it’s something we’ve used in or class many times. In this program, I used it to draw a 6×4 grid of cells that start off empty but that the user can fill by clicking on them. Whenever the user “draws” in this way, the program attempts to guess what digit was drawn. I currently only provided training data for the digits 0-3. The students had do do the rest of the work to make it work for all digits 0-9. I wanted to make the representation of this grid as simple as possible so I made a 1-dimensional array of 24 1’s and 0’s: A 1 is a cell that’s filled in and a 0 is a cell that’s empty. They go from left-to-right, bottom-to-top the same way we read. So, as a class we looked at an example like the ‘2’ that I drew above and produced an array that would represent it: [1,1,1,1, 1,0,0,1, 0,0,0,1, 1,1,1,1, 1,0,0,0, 1,1,1,1]. The whitespace between groups of 4 help us to understand that each group of 4 represents a row in our grid. The training function in the code is where we have to insert our training data. A line might look like this:
{ input: [1,1,1,1, 1,0,0,1, 0,0,0,1, 1,1,1,1, 1,0,0,0, 1,1,1,1], output: { 2: 1 } },
We input the grid, and the output says that the probability that the input we provided is a “2” is 1 (i.e. We’re 100% confident this is a “2”). By this point, the students wanted to jump in and start adding their own data.
At the beginning of the tasks many of the questions are technical (maybe they’re getting syntax errors because they forgot a bracket or a curly brace), but once every figures out how to successfully add new test cases there are process questions like “How many test cases do I need to add?” I don’t give any guidance on this front, I just let them know that we’ll be testing out their implementations together. This encourages them to test out their own model beforehand. I also ask them questions as I’m circulating the room like “How many different ways can you think of to draw a 4?” or “Are there any numbers that could look similar to one another?”
Once we move onto testing, we quickly see that no one’s program works all the time. There’s a good chance we’ll be able to easily find some cases that are obviously wrong. So I might end up with something like this:
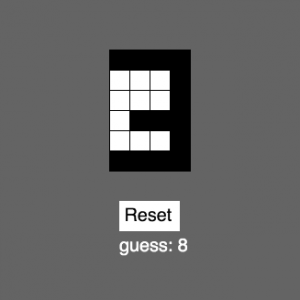
I can see why our program might think this is an 8, if we filled in 3 or 4 cells on the left border it would definitely look like an 8. But, as humans, we can look at this and agree that it’s most likely a 3. To improve our program we can train it with this case. In our program it would like like this:
{ input: [1,1,1,1, 0,0,0,1, 0,0,0,1, 0,1,1,1, 0,0,0,1, 1,1,1,1], output: { 3: 1 } },
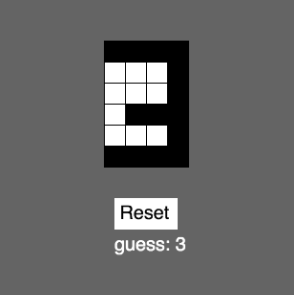
And, after we re-run our program and try again, it gets it right:
We had good discussion both before and after the activity. We talked about how this process is different than the ways we’ve implemented algorithms in class before, where we give the program a step-by-step procedure to follow that we can easily trace. In this task, we give the program examples and it comes up with the rules. It’s messy and not as predictable, but it’s quite powerful. Trying to write our own algorithm to take a list of 24 1’s and 0’s and determine what digit it most closely resembles would be very difficult and the edge cases would take a long time to account for. Here, if we find a case that doesn’t work, we just throw another line of training data at it.
And if we look back at those 5 steps of predictive modelling, we’ve done each one:
- Obtaining data – coming up with different ways to represent the digits
- Correctly formatting the data – putting them into lines of code that syntactically work in our program
- Training a model with the data – running the program after we’ve input the new lines
- Testing your model – trying it out, drawing digits and seeing if it gets them right
- Improving your model – when we find failed cases, we add more training data (Which sends up back to step 1)
What’s next?
Teaching at the secondary level, we tend to go broad but not too deep. I expose the students to all kinds of topics in computer science but the main learning goal is to build their skills in engaging in the processes rather than remembering all the details of the content. But, every now and then, some students will really latch on to a particular topic we covered which could help inform future projects that they either complete for my class or on their own. There are lots of directions to go from this simple lesson.
Bigger Test Cases
We just looked at a 6×4 grid. The original data set I referenced, MNIST, represented hand drawn digits as 28×28 grids. Or if you want to move into image recognition, a single image could have thousands or even millions of pixels with different color data in each.
More Training Data
At the end of the activity, we might have generated dozens or depending on your class size, hundreds of test cases but in the world of Big Data, that’s miniscule. MNIST has 60,000 training cases and 10,000 for testing. And think about how much data you’d want to give to something like a self-driving car where lives are on the line. You will have to develop more sophisticated methods for collecting and using data if you want to start working with large quantities of it.
Offline Training
The program I wrote trains the model in real-time. Once you start using much larger sets of data the time it takes to train the program increases dramatically. To accommodate this, you will need to be able to train the data offline and generate a pre-trained network that you could plop into a website if you wanted people to present it without having to wait for it to re-train every time.
Resources
Between the time I ran this lesson and writing this post, A new javascript library was released by Google’s AI team: tensorflow.js. But if you really wanted to dig into machine learning, Javascript is not the best way to go due to performance. I like it for the classroom for the speed with which we can implement and test our programs. Using TensorFlow with Python would be a good route to explore.