Collision Detection

I recently read a great explanation of the Gilbert-Johnson-Keerthi Distance Algorithm for Efficient Collision detection. I highly recommend checking it out. I’ve used collision detection as a way of teaching both math and computer programming concepts to students for a few years and would love to share some of the examples I’ve made with other educators and students.

What is Collision Detection?

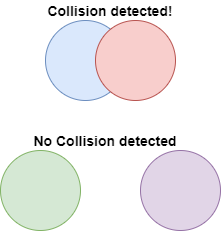
I suppose, first I should explain what collision detection is. It’s basically checking to see if two shapes are overlapping at all:

Why would we care if two shapes are colliding or not? Well, there are several situations where this information is important: in video games to see if the player is being hit by an enemy, in physics simulations to check if two objects are bumping into one another or in robotics when interpreting sensor data.

Circles

Now that the answer to the “But, when are we gonna use this in the REAL world?” question is out of the way, how do we actually do it? Let’s just consider circles for now. What information do we need to figure out if two circle are colliding? See if you can figure it out by playing with the example below. Note that r1 and r2 are the radii of the circles.

What was the relationship between the distance and the sum of the radii when the circle are colliding? We can represent it in pseudocode:

if (distance < r1 + r2) then
circles are colliding
else
circles are not colliding
end if

Your inner mathematician might be saying “If they are equal, the circles intersect at a point, they should be colliding!” That’s fine, change the “less than” in the code above to a “less than or equal to” but with how floating point arithmetic works, it should be functionally equivalent. The only reason you can get the distance to equal 75 above is because I rounded the actual value to avoid the ugliness of a ton of numbers after the decimal point. Edge cases like that make for good classroom discussion.

To draw the circles to the screen we need to already know the radius and location of the center of each circle. But we will have to compute the distance ourselves. If you know the center of circle 1 is at (x1, y1) and the center of circle 2 is at (x2, y2) we can use the Pythagorean Theorem (or distance formula) to find the distance.

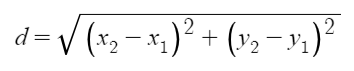
If we wanted to express that in pseudocode, we do something like:

dx = x2 - x1
dy = y2 - y1
distance = sqrt( dx*dx + dy*dy )

Above I used intermediate values of dx and dy to represent the difference in the x values and the difference in the y values. This isn’t required. We could have made this a one-liner but for the sake of clarity, I broke it down into multiple steps. I also just multiplied dx by itself to square it even though some languages have an exponentiation operator (** in python) or a power function like Math.pow().

Cool, that’s about all there is to that example. If you want to play around with the code yourself, here you go.

Spheres

I told you that collision detection is used in video games but aren’t more and more video games being made in 3D nowadays? We just looked at circles which are 2D. Let’s see if we can extend our approach to work in 3D by considering two spheres instead of two circles. This next toy has sliders to control the position of one of the spheres in the x, y and z direction. Try to make them collide. What information do we need to figure out if they are colliding? No numbers on screen provided this time:

You may have realized that the information we need is identical: the radius of each sphere and the distance between them. The same general method stated in the 2D case works for the 3D case. Of course, this time we’ve now got to consider the position of each sphere in the z direction. But luckily, we don’t have to tweak our distance formula very much to make it work:


Or, in pseudocode:

dx = x2 - x1
dy = y2 - y1
dz = z2 - z1
distance = sqrt( dx*dx + dy*dy + dz*dz )

if (distance < r1 + r2) then
spheres are colliding
else
spheres are not colliding
end if

For a good explanation of why this is, check out Math is Fun. But if tinkering with code sounds more fun to you, here it is.

Rectangles

Alright, 2D, 3D, we’ve got this! But, what if we want other shapes like rectangles or cubes? No radius in a rectangle, so our above method wouldn’t work. But, circles alone won’t always cut it. Consider the following situation:

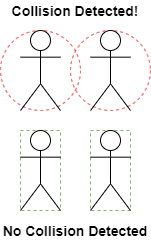
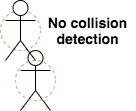
With bounding circles, we might get a false positive and think two objects are colliding when they aren’t. You could shrink the circles around them to reduce the number of false positives but then you’d end up with false negatives:

Sometimes, rectangles will just be a better fit than circles for the objects we want to enclose. So, let’s try to figure out how to tell if two rectangles are colliding.


If you want spoilers, see how I did it in the code.

Unfortunately, there’s not an elegant mathematical formula like the Pythagorean Theorem that can help us out this time. We’ve got to do some logical deduction and come up with a set of rules. It may be easier to thinking about one dimension at a time.

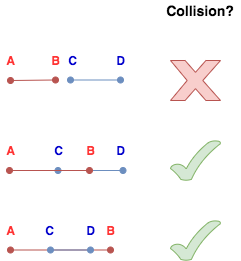
In the diagram above, we see that we can draw the two line segments such that A is always to the left of B and C is to the left of D. The question of collision becomes about the relationship of the points on the red segment to the points on the blue segment. The rule to me seems to be that if A is to the left of D and B is to the right of C, the segments collide. This holds for these 3 examples. Try coming up with more and see if that rule holds or if you can find an exception.
The next challenge is to extend this from 1D to 2D.


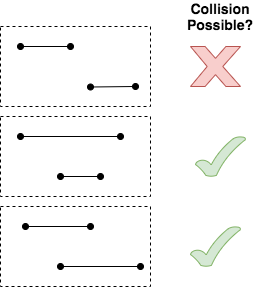
In this diagram, imagine you’re only seeing one side of a rectangle for each of the given line segments. For two of the pairs, you could draw rectangles that would be colliding but for the first, you can’t. Try it if you don’t believe me.

Now, rotate these examples 90 degrees. You will see that the same rule above can tell us whether the projections of a rectangle onto either the x-axis or the y-axis collide. We have to combine all that to form a single conjunctive logical rule (by that, I mean several comparisons connected with “and”).


When drawing rectangles in code, you might have 4 points but more likely you just have one point (most commonly, the top left corner) and the width and height of the rectangle. We can still figure out the other points from that information give that these rectangles are axes aligned. For example, the bottom right corner of the first rectangle would be (x1+w1, y2+h2) and the top right corner of the second rectangle is (x2+w2, y2). This is enough information to allow us to write some pseudocode:

if (x1 < x2 + w2)
and (x1 + w1 > x2)
and (y1 < y2 + h2)
and (y1 + h1 > y2) then
rectangles are colliding
else
rectangles are not colliding
end if

This will likely take more work to convince yourself it’s true than the circles and spheres. Come up with examples, see if you can find any that this code fails on.

Many collisions

In a game or a simulation, it’s likely there are more than two objects on the screen at a time. So, we need to be able to take the concepts above and apply them repeatedly in a given scene. The example below isn’t interactive like the rest but keep an eye on how quickly the number of collisions adds up:


(As always, feel free to play with the code. Try changing the 3 values at the top and seeing what happens.)

One way you could handle all these collisions is by using an array to store all the objects and a loop to iterate through them all and another loop nested inside of that to check like this:

N = 15
circles = new Array(N)
//add circles to the array
index1 = 0
loop from 0 to N - 1
start = index1 + 1
index2 = index1 + 1
loop from start to N - 1
//check if circle[index1] is colliding with circle[index2]
index2 = index2 + 1
end loop
index = index + 1
end loop

That’s a lot of collision checks. The first circle is checked against the other N – 1 circles, then the 2nd circle is checked against the remaining N – 2 and so on. Another math connection here: arithmetic sequences and series. If we add it up, there would be (N2 – N) / 2 comparisons. There are definitely ways to do this more efficiently. If that interests you, you might want to investigate techniques like space partitioning.

This is a really fun topic to me. It’s rife with connections between math and computer science. There’s tons of possible extension and it can be used to create really fun projects. Most modern game engines will handle collision detection for you, but understanding how your tools work helps you get better at using them. I hope you enjoyed playing around with these examples as much as I enjoyed creating them.

All the examples in the post were written using p5.js, a javascript library meant to be accessible and used for creative expression. I made the diagrams using draw.io which will soon be changed to diagrams.net.

Build-A-Borg Workshop

This previous semester, I taught a computer programming class to a small group of students using the British Columbia curriculum. The curriculum focuses very much on process over content. In computer programming, the emphasis is on the development process over writing code. One thing I like about this is that there are lots of opportunities to get students off of their computers. While I love programming, I want the students to see it doesn’t require being glued to a screen all day.

My latest project was inspired, as many great projects are, by student interest. When trying to explain logic using light switches as an example I could see eyes glazing over. I noticed a student with a stuffed animal attached to her backpack and I asked if I could borrow it. I asked the class to imagine we were going to give this toy an upgrade and add lights and buttons to it. Maybe rubbing its belly would cause its cheeks to light up or booping its nose might make it coo. They quickly came up with many ideas for how we could use buttons lights and sounds to make this toy more exciting. After this success in a theoretical lesson, I asked if they’d be interested in making this a reality and an enthusiastic “yes” was the consensus.

That evening I gathered supplies and went out and found the cutest stuffed animal that was on sale and of reasonable size. To create our cyborg bears we also needed an Arduino with a USB cable, breadboard, some LEDS, resistors, push buttons, wires, alligator clips, and a sewing kit to open and close our toy.

During the course of this project I gave mini-lessons on boolean logic including truth tables, if-statements, how to write programs in processing and upload it to an Arduino, prototyping with breadboards and making circuits.

Students each sketched the bear and came up with ideas for where to put push buttons (inputs) and LEDs (outputs). I then had them create truth tables that described which lights would come on for each combination of buttons being pressed. This would be translated into a program in processing that would be uploaded to their Arduinos. At the same time they needed to create the necessary circuits. They could test out the functionality before doing anything with the stuffed animal.

While everyone loved the idea of enhancing the bear, they gave looks of horror when I told them it was time to open the bear up to put our circuit inside. No one else wanted to make the first cut so I did it for them but once that part was over it was no time before the were ripping excess stuffing out to make it easier to get their hand inside and connect LEDs to their wires.

It was pretty orderly at first, but as more LEDs and buttons were put in, the amount of wires caused a bit of a mess so strategizing how to best physically organize everything became important.

The first LED and button being added and working was a big milestone that got everyone excited about seeing the final result. After school, students brought their friends from other classes to come look at what they had made.

At the end we had to sew it back up but a hole was left to plug the USB cable into the Arduino for power and so we could upload code from different students to change the functionality. This was a great chance to drive home the fact that computer science is an iterative and creative process.

What went well

  • Student motivation was through the roof during this project. Their  sense of pride after each phase was extremely evident
  • There was great collaboration between students, everyone wanted to participate and the readily helped troubleshoot for one another.
  • There was some authentic struggle taking place that students persisted through due to just wanting to see it work
  • The project was real world and “messy” challenges/obstacles presented themselves like getting wires tangled up, having exposed wires touching causing circuits to fail, etc… They had to physically get the components somewhere inside the bear they wanted instead of just neat and orderly on a breadboard

What I would change

  • I’d set more explicit expectations about writing in their engineering journals regularly. I got them talking and discussing but getting them to do written reflection was tough so some of that great talk didn’t get recorded
  • I’d like to come up with a wider variety of project ideas. There’s no one-size-fits-all project that hooks everyone so the more ideas I bank up, the more likely I am to be able to get more students engaged and energized about what they’re working on.
  • Extending what I did, I would’ve like to use more types of input/output like something to make noise, moving parts, temperature sensor, gyro sensor, etc… We also could’ve made the changes to the bear more permanent by making a pouch and inserting a battery pack instead of needing to have it plugged up and soldering everything in place instead of holding it together with prototyping materials (though as is, it’s nice since we can take it all apart and have new students reuse everything)


Public Speaking in Thai

This weekend Thailand hosted its first ever PyCon: a conference dedicated to the Python programming language. This was a great opportunity to meet fellow developers in the region and learn more about topics like Deep Learning, Natural Language Processing, Graph Theory and more. I even contributed with a talk on Teaching and Learning with Python. Another fun part of the conference is the lightning talk session. Lightning talks are 5 minute talks that anyone can sign up for that happened at the end of each day in the main hall. It’s a chance for people to dip into speaking at a conference or to test the water for new ideas or just to share something cool they’ve been working on. While I already have some experience in that arena, I have zero experience speaking in public in Thai. I decided to take the risk of trying my hand at it. I’d say around half or more of the audience understood Thai, but definitely a large part that did not so I made slides in English and Thai but made a goal of only speaking Thai during the presentation. There were a couple times when I couldn’t think of the word I wanted to say in Thai and was tempted to just say it in English but didn’t, I either found another way to express myself or just left the comment out. Below are the slides I created and used for the talk:

I already started realizing how hard translating this all would be by slide 1. For the first word should I use เรียน (riian – to study at the elementary level), เรียนรู้ (riian rúu – to undertake to study; learn; study), ศึกษา (sʉ̀k sǎa – to study; to be educated; to receive education; to go to school; to learn (at higher levels such as college)) or something else? And the connecting word, am I learning/studying with/by/through programming? What’s the most Thai way to express it? And it seems I was so focused on getting the Thai correct that I forgot to capitalize the ‘p’ in Programming for my title in English.

When I actually gave the talk, I was thinking “should I explain what I’m doing in English, that I’m learning Thai and want to practice speaking or should I just start speaking in Thai, I’m sure it won’t be very hard for them to figure out I’m just learning…” I jumped right in with an unsure “สวัสดีครับ… ทุกคน ยินดีต้อนรับ” (sà wát dii kráp… túk kon, yin dii dtɔ̂ɔn ráp – Hello… everyone. Welcome.”

After the initial awkwardness, I felt a little more comfortable. Sure, I’m speaking a new language and I might mess up but there are slides to help people figure out what’s going on even if I mispronounce something. I push my students who are English Language Learners to take risks and make an attempt. It’s more about pushing yourself out of your comfort zone and learning and getting your point across than delivering a perfect speech.

“วันนี้ผมจะพูดเกี่ยวกับ…” (wan níi pǒm jà pûut gìao gàp – Today I will speak about…)

Now for introductions. Pretty standard for a presentation, but it did feel rather like day 1 in a language class.

ประมาณ (bprà maan – approximately) was a new word for me. I’ve heard it before but I’ve never actually used it in conversation. I think the experience of using it in a talk in front of a large audience will help it stick in my memory pretty well.

Got my first laugh here. There’s a term for people who are half Thai, ลูกครึ่ง (lûuk krʉ̂ng – half child).

“ไม่ใช่ลูกครึ่ง เป็นลูกครึ่งครึ่ง” (mâi châi lûuk krʉ̂ng bpen lûuk krʉ̂ng krʉ̂ng) – “I’m not half Thai, I’m half half Thai”

The term for people like me who have 1 Thai grandparent and 3 non-Thai grandparents is “ลูกเสี้ยว” (lûuk sîao – crescent child) a reference to the crescent moon.

An interesting tidbit about the Thai language is that there are different words for maternal and paternal grandparents, so by using the word คุณย่า (kun yâa – paternal grandmother) instead of คุณยาย (kun yaai – maternal grandmother) it can be inferred that it’s my dad’s mom who is Thai, not my mom’s mom without me needing to elaborate.

After introductions I showed a few of the programs I made to help me learn Thai and explained briefly what they did. The first one was my program to help tell the time. This came from one of my first posts on this blog, Telling Time in Thai.

Second program, my Days of the Week quiz, also about something I made for the blog. I did say the English words “Saturday, Sunday, Friday” here because I was explaining that you have to select the correct English word in this example. Though my childlike enthusiasm when saying “ถูก!” (tùuk – correct, can also mean inexpensive) got me another laugh from the crowd.

This is the only example I shared that isn’t from the blog, JamDai, the Vocabulary Card Matching Game I made. Instead of ถูก, this one ends with a supportive เก่งมาก (gèng mâak – very good, clever, skillful, superbly performed).

The final example I shared was the Thai Chat Bot I made recently. Got a couple more laughs here excitedly reading the chat between myself and the bot and explaining that the bot is male since he uses the polite term “ครับ” (kráp) instead of “ค่ะ” (kâ).

Though, if I end up adding text-to-speech that may change since all the existing Thai text-to-speech tools I can find only have a female voice. I have noticed that general service messages, or posted announcements tend to be either gender neutral or use female terms. Another interesting difference between Thai and English is that there’s no difference between she and he, it’s the same word (เขา – kǎo) so no need to worry about misgendering someone because you don’t need to refer to people by their gender. Though you do gender yourself by the self-referential pronouns you use, ผม (pǒm – I (male)) and ฉัน (chǎn – I (female)). There are instances when speakers will use the opposite gender terms such as a male using female terms with close family members or intimate partners to show softness/gentleness (it’s common for male singers to use ฉัน in love songs for example) or women might use male terms to show harshness or to be stern. Reveals some of the cultural connotations surrounding gender.

I’m very glad I took this risk even though it was scary, I’m happy with how it went. I hope to continue growing and using my Thai language skills. It would be great to be able to speak directly to the parents of my students who speak Thai instead of relying on a translator (though, the Thai staff that helps us with that are awesome!) And of course, the most rewarding way in which I use this skill is getting to connect more with my family members on this side of the globe. Even though initially, I barely knew any Thai, they’ve been so kind, welcoming and warm to me.

I have to give a special shout-out to my wonderful girlfriend, Mild, who took a look over my slides for me and offered suggestions to improve them. In general, she’s been a huge factor in helping me learn and pushed me take chances like this.

Making a Thai Chat Bot

An assignment I’ve seen several Computer Science teachers give their students is to write a chat bot. I thought that could be cool to do with my students and I always run though assignments myself before assigning them to a class. So, for my take on the assignment, I decided to make a chat bot that speaks Thai. For the code, check it out on codepen. Note that the bot only knows the Thai script, phonetic transcription won’t work. To chat with it visit this page or try it out below:


There are lots of Natural Language Processing (NLP) tools out there for English but there aren’t as many in Thai. I took a pretty naive approach to my implementation since there are several challenges in NLP unique to Thai (even tokenizing words is nontrivial since there aren’t spaces between words in the Thai script).

The relevant function in the code is the one that determines what the bot’s response will be to what the user types. To start, lets just have it respond with ไม่เข้าใจ (mai kao jai – I don’t understand) to anything said. Our bot just arrived in Thailand and doesn’t know any phrases other than this.


function chatbotResponse() {
  botMessage = "ไม่เข้าใจ";
}

Alright, we have something going. Next, let’s teach our bot some basic greetings. How do we know if someone is greeting us? We could check to see if the user includes “สวัสดี” or “หวัดดี” anywhere in their message. That covers formal or informal and whatever articles someone may add at the end. It would catch user messages like “หวัดดี” (wat dee – hi) and “สวัสดีค่ะ/ครับ” (sawatdee ka/khrab – Hello) or as my first student tester entered: “สวัสดีจ้าาา” (sawatdee jaaaa – more colloquial way of saying hello in chat) Let’s respond with a random greeting such as สวัสดี (sa wat dee – hello) or สวัสดีครับ (sa wat dee khrab – hello). I’ve chosen to make my bot male so I’ll use particles like ครับ instead of ค่ะ. I’ll remember that going forward to stay consistent.


if (lastUserMessage.includes('สวัสดี') || lastUserMessage.includes('หวัดดี')) {
  /* randomElement is a custom function to pick one of the words in the given list */
  botMessage = randomElement(['สวัสดี','วัสดีครับ','สวัสดีครับ']);
}

Cool, now maybe we should give our bot a name. “Bot” seems appropriate, but let’s write it in Thai:


botName = 'บอท';
if (lastUserMessage.includes('ชื่อ')) {
  botMessage = 'ผมชื่อ' + botName;
}

Again, บอท is male, so we used ผม (pom) for I instead of ฉัน (chan). Next, we should check if the user is asking how we are. Since Bot is a pretty chill guy let’s have him always give a positive response.


  if (lastUserMessage.includes('เป็นอย่างไรบ้าง') || lastUserMessage.includes('สบายดีไหม') || lastUserMessage.includes('สบายดีมั้ย')) {
    botMessage = 'สบายดีมากครับ';
  }

Alright, we’re beefing up Bot’s vocabulary. How about another easy one, “Thank you” and “You’re welcome”. In Thai we might say thank you with either ขอบคุณ ครับ/ค่ะ (kop khun khrap/ka) or the more casual ขอบใจ (kop jai). We could respond with ยินดีครับ (yin dee khrap – you’re welcome) or ไม่เป็นไร (mai bpen rai – no problem/no worries), and of course we could always throw a ครับ (khrap) at the end to add some politeness.


  if (lastUserMessage.includes('ขอบคุณ') || lastUserMessage.includes('ขอบใจ')) {
    botMessage = randomElement([
      'ยินดีครับ',
      'ไม่เป็นไร',
      'ไม่เป็นไรครับ'
    ]);

Let’s give our bot a useful feature. How about telling you the time if you ask? กี่โมง (gee mong (long ‘o’ sound)) is how to ask what time it is so let’s check if the user writes that. And if so, we’ll print out the current time.


/* what time is it? */
if (lastUserMessage.includes('กี่โมง')) {
  botMessage = new Date().toLocaleTimeString();
}

Now, how about a sense of humor? When chatting in Thai, it’s common to see the number 5 (pronounced ‘ha’ in Thai) used for laughter. Maybe 555 or even more 5’s if it’s really funny. So, if we see the word ตลก (talok – funny) in the user’s message let’s output a string of 5’s (anywhere from 3 to 9) to indicate Bot’s amusement.


if (lastUserMessage.includes('ตลก')) {
  let extra_fives = Math.floor(Math.random()*6);
  botMessage = '555';
  for (var i=0; i < extra_fives; ++i) {
    botMessage += '5';
  }
}

Alright, let’s try something a bit more complicated. Let’s try to detect if the user is asking a question and respond either positively or negatively. ไหม (mai, also written as มั้ย) is a particle added to the end of a statement to make it a question. i.e.

เอาไหม (ow mai – do you want it?)
or
ไปไหม (pai mai – do you want to go?)

To respond positively we just chop off the question particle and use the verb i.e.

เอา (ow – I want it)
or
ไป (pai – let’s go)

To respond negatively we still chop off the particle but also add a negation (ไม่ – mai, with a falling tone) in front i.e.

ไม่เอา (mai ow – I don’t want it) or
ไม่ไป (mai pai – let’s not go).


if (lastUserMessage.includes('ไหม')) {
  let i = lastUserMessage.search('ไหม')
  botMessage = lastUserMessage.substr(0,i);
  let coinflip = Math.floor(Math.random()*2);
  if (coinflip) {
    botMessage = 'ไม่' + botMessage;
  }
}

if (lastUserMessage.includes('มั้ย')) {
  let i = lastUserMessage.search('มั้ย')
  botMessage = lastUserMessage.substr(0,i);
  let coinflip = Math.floor(Math.random()*2);
  if (coinflip) {
    botMessage = 'ไม่' + botMessage;
  }
}

I won’t list every single thing I put into the program here but I’ve added more stuff to it. Feel free to chat with บอท to find more messages I’ve added. Or peek at the code. If you’ve got more suggestions for what to teach him, let me know!

Machine Learning Lesson

A very important part of my job as a K-12 computer science teacher is to take concepts that may seem impossibly complex to some and come up with ways to make them more accessible to all of my students. In this post, I’d like to share an activity I did with my students grades 7-10 to engage them in machine learning.

There are many aspects to machine learning and the process I guided my students through is predictive modelling which consists of 5 steps:

  1. Obtaining data
  2. Correctly formatting the data
  3. Training a model with the data
  4. Testing your model
  5. Improving your model

Like many processes in engineering/design, this is not a process you step through once. It is a cycle you perform multiple iterations of and there is no set number of times you should go through the cycle.

I was inspired to tackle this subject with my students after watching a video on youtube by LearningCode.academy: “Machine Learning Tutorial for Beginners – USING JAVASCRIPT!”

There were several things I liked about this video:

  • It was short (less than 12 minutes)
  • I could jump right into the provided example code and start playing around with it with no setup required
  • The problem presented was easy to understand

All these things told me I could make a lesson plan out of it. If I stand in front of my students and lecture for more than 10-15 minutes I will lose most of their attention. I need to be able to get them engaged in a meaningful task for the most learning to occur. So, having tedious setup to go through on their computers would also be detrimental which is why I like online tools like codepen for in-class activities.

I did feel like I needed a different problem from the one in the video, one that could encourage both collaboration and individual effort. I thought of a well-known beginner project in machine learning, Building a model to recognize handwritten digits in Tensorflow. That project, as it is, is a bit out of scope for a 1-hour class with middle school students so I created my own version. I like the notion of recognizing digits, there are 10 distinct items we want to train our model to recognize and there are many ways to collaborate here. Even if students are tempted to split up the individual digits and have specific people get the model working for specific digits, they’ll still have to put their data together and test it out and find test cases that fail and work together to improve the model.

Here’s the program I made. I used two libraries. First, brain.js  (Neural Networks implemented in JavaScript) and second, p5.js (a JavaScript library similar to Processing, made to make programming more accessible).

I used p5.js since it’s something we’ve used in or class many times. In this program, I used it to draw a 6×4 grid of cells that start off empty but that the user can fill by clicking on them. Whenever the user “draws” in this way, the program attempts to guess what digit was drawn. I currently only provided training data for the digits 0-3. The students had do do the rest of the work to make it work for all digits 0-9. I wanted to make the representation of this grid as simple as possible so I made a 1-dimensional array of 24 1’s and 0’s: A 1 is a cell that’s filled in and a 0 is a cell that’s empty. They go from left-to-right, bottom-to-top the same way we read. So, as a class we looked at an example like the ‘2’ that I drew above and produced an array that would represent it: [1,1,1,1,  1,0,0,1, 0,0,0,1, 1,1,1,1, 1,0,0,0, 1,1,1,1]. The whitespace between groups of 4 help us to understand that each group of 4 represents a row in our grid. The training function in the code is where we have to insert our training data. A line might look like this:

{ input: [1,1,1,1, 1,0,0,1, 0,0,0,1, 1,1,1,1, 1,0,0,0, 1,1,1,1], output: { 2: 1 } },

We input the grid, and the output says that the probability that the input we provided is a “2” is 1 (i.e. We’re 100% confident this is a “2”). By this point, the students wanted to jump in and start adding their own data.

At the beginning of the tasks many of the questions are technical (maybe they’re getting syntax errors because they forgot a bracket or a curly brace), but once every figures out how to successfully add new test cases there are process questions like “How many test cases do I need to add?” I don’t give any guidance on this front, I just let them know that we’ll be testing out their implementations together. This encourages them to test out their own model beforehand. I also ask them questions as I’m circulating the room like “How many different ways can you think of to draw a 4?” or “Are there any numbers that could look similar to one another?”

Once we move onto testing, we quickly see that no one’s program works all the time. There’s a good chance we’ll be able to easily find some cases that are obviously wrong. So I might end up with something like this:

I can see why our program might think this is an 8, if we filled in 3 or 4 cells on the left border it would definitely look like an 8. But, as humans, we can look at this and agree that it’s most likely a 3. To improve our program we can train it with this case. In our program it would like like this:

{ input: [1,1,1,1, 0,0,0,1, 0,0,0,1, 0,1,1,1, 0,0,0,1, 1,1,1,1], output: { 3: 1 } },

And, after we re-run our program and try again, it gets it right:

We had good discussion both before and after the activity. We talked about how this process is different than the ways we’ve implemented algorithms in class before, where we give the program a step-by-step procedure to follow that we can easily trace. In this task, we give the program examples and it comes up with the rules. It’s messy and not as predictable, but it’s quite powerful. Trying to write our own algorithm to take a list of 24 1’s and 0’s and determine what digit it most closely resembles would be very difficult and the edge cases would take a long time to account for. Here, if we find a case that doesn’t work, we just throw another line of training data at it.

And if we look back at those 5 steps of predictive modelling, we’ve done each one:

  • Obtaining data – coming up with different ways to represent the digits
  • Correctly formatting the data – putting them into lines of code that syntactically work in our program
  • Training a model with the data – running the program after we’ve input the new lines
  • Testing your model – trying it out, drawing digits and seeing if it gets them right
  • Improving your model – when we find failed cases, we add more training data (Which sends up back to step 1)


What’s next?

Teaching at the secondary level, we tend to go broad but not too deep. I expose the students to all kinds of topics in computer science but the main learning goal is to build their skills in engaging in the processes rather than remembering all the details of the content. But, every now and then, some students will really latch on to a particular topic we covered which could help inform future projects that they either complete for my class or on their own. There are lots of directions to go from this simple lesson.

Bigger Test Cases

We just looked at a 6×4 grid. The original data set I referenced, MNIST, represented hand drawn digits as 28×28 grids. Or if you want to move into image recognition, a single image could have thousands or even millions of pixels with different color data in each.

More Training Data

At the end of the activity, we might have generated dozens or depending on your class size, hundreds of test cases but in the world of Big Data, that’s miniscule. MNIST has 60,000 training cases and 10,000 for testing. And think about how much data you’d want to give to something like a self-driving car where lives are on the line. You will have to develop more sophisticated methods for collecting and using data if you want to start working with large quantities of it.

Offline Training

The program I wrote trains the model in real-time. Once you start using much larger sets of data the time it takes to train the program increases dramatically. To accommodate this, you will need to be able to train the data offline and generate a pre-trained network that you could plop into a website if you wanted people to present it without having to wait for it to re-train every time.

Resources

Between the time I ran this lesson and writing this post, A new javascript library was released by Google’s AI team: tensorflow.js. But if you really wanted to dig into machine learning, Javascript is not the best way to go due to performance. I like it for the classroom for the speed with which we can implement and test our programs. Using TensorFlow with Python would be a good route to explore.